Posted by: iainduncani | May 10, 2015

2015 Election under AV+

I argued after the last election that AV+ would be a better way to elect our MPs. This is the system proposed by the Jenkins Commission to use AV on 80% of the seats and some form of PR in the remaining 20%. This would keep people having a local MP with the opportunity to have a single party majority but at the same time introduce a level of proportional representation.

There has been renewed talk since this election about our electoral system and whether we should have more PR. I have seen projections as to what the result would look like under various PR systems but not for AV+. Making a full prediction for AV+ is beyond my analytical ability but adding in 20% PR to the election result is relatively trivial[1] – let’s call it FPTP+. Once this is done you get:

CON       312

LAB        226

SNP        50

LD          17

UKIP      16

GRN        6

PC           3

So not that dissimilar to the actual result but would leave the Conservatives requiring extra support from other parties. Unlike a full PR system though it does leave them with more options, UKIP, Lib Dems or the DUP would all have enough seats to push the Tories into a majority.

Having seen how it may have affected this election I still like AV+ system. I think having more representation for the smaller parties is a good thing, how 16% of the electorate can end up with 2 seats is baffling. Having said that I also like how this system still produces a clear “winner” even if they do only get 37% of the vote.

Overall my hope is that if we had a more proportional electoral system we would see more cooperation and less bickering in politics. During the campaign I was often disgusted with the vitriolic language directed at Labour and Conservative friends have expressed the same on social media since. It amazes me in Europe that you can get grand coalitions, it seems like such a good idea to have a government that unites the main parties. Combining the centre left and centre right parties would also block out the nationalist elements on the left and right that we have seen rise this time around. What more could look like the “one nation” government building a “greater Britain” than David Cameron wants?

[1] Methodology: I did the PR regionally for England, Scotland and Wales. This all makes the massive assumption that people’s voting habits wouldn’t change to reflect the voting system which is highly unlikely, you would expect tactical voting to be less and fringe parties to get more votes under PR. A break down of the numbers is here:

https://docs.google.com/spreadsheets/d/1-Fz1Y2zftohenUfEgYKYgdC68OI-k1U9mEppa32RCG4/edit?usp=docslist_api

Posted by: iainduncani | December 23, 2011

EclipseZone OSGi tutorials

I really enjoyed Neil Bartlett’s series of “Getting started with OSGi” tutorials in EclipseZone that take you from a very basic getting started tutorial all the way to using Declarative Services.  The only critism I had though is how hard it was to find them listed in the right order!  So here are links to all of them:

  1. Getting started with OSGi: Your first bundle
  2. Getting Started with OSGi: Dependencies between Bundles 
  3. Getting Started with OSGi: Registering a Service
  4. Getting Started with OSGi: Consuming a Service
  5. Getting Started with OSGi: Dynamic Service Tracking
  6. Getting Started with OSGi: Introducing Declarative Services
  7. Getting Started with OSGi: Declarative Services and Dependencies

Getting Started with OSGi: Dependencies between Bundles

Posted by: iainduncani | November 18, 2011

Fishing for a boller hat (with an umbrella)

We were up in London the other day and as we we wandered past Buckingham Palace we saw this chap with a fishing rod fashioned out of gaffa tape and an umbrella:

Umbrella being used as a fishing rod

It turned out that his friend had dropped his brand new boller hat into the fountain. Unfortunately the fishing approach didn’t work so there was only one thing for it:

Man getting his hat from the fountain

He did get his hat back though!

Man with hat

Posted by: iainduncani | May 6, 2011

Southampton Council Election Summary

I couldn’t find a good summary of the Southampton council elections for the last few years. All of the data is on the council website with this years results here and past results here.

Southampton’s council elections work by electing one third of the 48 councillors at each election so to get a view of the makeup of the council you have to look at three election results and to see which seats were up for grabs this time you have to go back to the 2007 election. Therefore I’ve collated all that information in the table below, I’ve highlighted the seats that changed hands this election:

Seat 2007 2008 2010 2011
Bargate Labour Conservative Labour Labour
Basset Conservative Conservative Conservative Conservative
Bevois Labour Labour Labour Labour
Bitterne Labour Conservative Labour Labour
Bitterne Park Conservative Conservative Conservative Conservative
Coxford Labour Conservative Labour Labour
Freemantle Conservative Conservative Conservative Conservative
Harefield Conservative Conservative (x2) Conservative Conservative
Millbrook Conservative (x2) Conservative Labour Labour
Peartree Lib Dem Conservative Lib Dem Labour
Portswood Lib Dem Conservative Lib Dem Conservative
Redbridge Labour Conservative Labour Labour
Shirley Conservative Conservative Conservative Labour
Sholing Conservative Conservative Conservative Labour
Swaythling Conservative Conservative Lib Dem Conservative
Woolston Labour Labour Labour Labour
Totals
Conservative 9 15 6 6
Labour 6 2 7 10
Lib Dem 2 0 3 0

Note that in Millbrook in 2007 and Harefield 2008 two seats were up for grabs although neither for the full 4 year term so 1 of each of them got replaced in the future elections. This means the council now has 26 Conservative members, 19 Labour and 3 Lib Dems.

I found it interesting how the Tories actually gained seats from the Lib Dems as well as losing others to Labour.

Posted by: iainduncani | March 13, 2011

Making bamboo trellis

Continuing on my highly niche series of making things out of home grown bent bamboo I recently made an arch trellis for a rose to grow over our front door.

I’d been looking around various garden centres for an arch trellis but they all seemed to be quite big and suitable for sitting on top of fence panels. As I just wanted something over the doorway they would of looked far to bulky so I decided to make my own.

Having bent the bamboo in the same way I did for my mini-polytunnel I then screwed two planks of treated wood into the wall, one on each side of the doorway. I then just hammered staples around the bamboo to hold it between them. Now I just need to wait for the rose to grow a little more!

Picture of the finished trellis

Posted by: iainduncani | March 12, 2011

Making a mini-polytunnel

When we moved into our house and I saw we had bamboo growing I was a little worried. A friend of ours had bamboo in his garden and said it was an absolute nightmare, spreading all over the garden and blunting his lawn mower. We must have a different variety though as its stayed in place and has proved a great building material for various garden projects – the latest one being a home made mini-polytunnel (or if you are fan of oxymorons a tunnel cloche).

Bamboo bent and tied into loops

Figure 1: Bamboo bent and tied into loops

The nice thing about growing your own bamboo is that you can shape it whist it is still green and malleable. Unlike other home made polytunnels that bend two shop brought canes together with hose pipe to connect them into a loopI bent my cane as soon as I harvested it, tied it up and left it out in the sun to dry for a few weeks (see figure 1). This meant that I had a single smooth loop to work with.

I selected two loops of a similar size and used 4 straight canes to make a rectangular base. I then tied the two loops to each end of the base using garden twine.

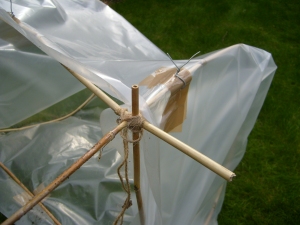
The next step was putting some polythene sheet that I got from a local garden centre over the top. I fixed it by wrapping it under the base and around the supports and tieing it on using some galvanised steel wire that I had left over from making raspberry supports (see figure 2). I wanted the tunnel to last a couple of seasons so I was worried the polythene would tear where the wire went through so on most of the ties I first stuck down some parcel tape to hopefully stop the tearing. Not sure how necessary this was and it does make it look a little messy so I’m not sure I’d do this again.

Figure 2: Bamboo loop tied to the base with polythene attached by some wire

Figure 2: Bamboo loop tied to the base with polythene attached by some wire

Reading around there are two concerns about polytunnels, the first is wind knocking it over and the second is ventilation. Bamboo really helped with both of these. Even with the fresh bamboo it was impossible to bend it into a complete circle so this means that the loops had long legs on them. I didn’t cut them down too small so this means that they can act as stabilisers when they are buried into the ground. As there is about a foot of cane underground I’m hoping this will be enough to stop it being blown over.

The low feet also allows me to raise up the polytunnel on hot days to give some ventilation. Even with the feet just half buried it still seems pretty stable but allows air to get underneath (see figure 3).

Figure 3: Finished polytunnel raised up slightly for ventilation

Figure 3: Finished polytunnel raised up slightly for ventilation

I’ve had it out on the veggie bed for a week now and its still not blown over! The one thing that I may do another time is to put an extra straight cane across the top to stop it sagging inwards although again I think the long feet help with this as they stop the ends toppling over at all.

Posted by: iainduncani | February 26, 2011

Making Marmalade

My homemade marmalade on toast
My Granddad has always made fabulous marmalade and a few years ago he taught me the tricks of the trade, I’m now in my third year of making it and finally have got the hang of it! To make it you need to keep an eye out in the supermarket for Seville oranges which are only around in the middle of January although I always freeze them as it softens the skin making it easier to work with and allows you to make it when you have time.

You also need to get hold of some muslin to put the pips in, I got some from ala cook as well as some of the wax discs for putting on top of the marmalade once it was jarred up. Putting the pips and pith in with the marmalade whilst it is cooking is key to getting it to set as they contain pectin which is what makes it set, I tried a muslin-free approach of boiling the pips and pith in a separate pan in my first year but that just lead to very sloppy marmalade!

One thing I didn’t write down at my Granddad’s was the quantities we used so I had to start from scratch which I didn’t think would be too tricky thanks to Google, however, I found all the recipes online varied massively for the amount of water and sugar to use. Instead of sticking to a particular recipe I took an average of the first few I came across so the quantities I used were:

  • 8 Seville oranges (1kg)
  • 2 lemons
  • 1.8kg sugar (either preserving or granulated)
  • 2.4L water
  • 1 tablspoon treacle
  • knob of butter

Juicing the oranges and cutting the skin in a food processor
The first step in making marmalade is to juice all of the oranges and lemons. I cheated for this and used a food processor which made it really quick and easy to do. Once they are juiced you need to scrape out the pith on the skin and put this in the muslin bag along with the pips, I tend to use two bags as it gets a bit big otherwise.

You then cut the skin into chunks, the size of the chunks is purely down to taste. I do some in the food processor for speed and some by hand to get bigger chunks. The lemon skin is a bit tougher and more bitter than the orange so I do that very small.

Once you’ve done this put the juice, skin, muslin bag full of pips and pith and water into a large pan, the mixture should only fill the pan half full as it will boil up a lot later on. You need to bring it all to a gentle boil with the lid off until all of the skin is soft, which takes about an hour and a half.

Marmalade boiling with sugar in it
At this point you need to add the sugar and treacle and bring it up to a rolling boil, this will take a lot of heat! I’m lucky as I’ve got gas hobs so I had it on full power on the biggest one and it still took a long time to reach setting point. Its at this point that you will realize why you need such a big pan, mine was only a third full to start with and it still nearly boils over (keep an eye on it at this stage as if it does boil over it will catch into a sticky fire, set the fire alarm off and take an absolute age to clean up, a bitter experience if you’ll excuse the pun).

At this point I put some plates in the fridge and sterilized the jam jars. To do this I put them upside down in a big pan and then poured in boiling water and boiled it for about 10 minutes, after they were done I put them in the oven on a low heat to dry them out, this also meant that they were warm when I added the marmalade to them which is important to stop them cracking.

After the marmalade mixture had been boiling for about 25 minutes I started testing it for setting point. I have a sweet thermometer and when it reaches 105°C it is supposed to set, however, I found that it didn’t so I had to do it the old fashioned way. This involves putting a spoonful of the mixture onto a plate that has been stored in the fridge, if it starts setting and forming a skin on the top of it after being put in the fridge for a couple of minutes then the marmalade is ready to be jarred up. I kept testing the mixture every 5 to 10 minutes but I found it took about an hour to reach setting point. Once it is at setting point add a knob of butter and stir it around, this will help clear the scum that forms on the top whilst it is boiling.

Adding wax lids to the marmalade
Finally I put it into jars, the quantities above will make about 7-8 jars. Then put a wax lid on top of it and it is ready for eating!

Posted by: iainduncani | September 30, 2010

Generosity in a Cynical World

We recently converted our front garden into a fruit garden ripping up several ugly shrubs and replacing them with strawberries, redcurrants, black currants, white currants and blueberries. Working out the front all day meant that we got to meet a lot of people who live on our street. Almost everyone we spoke to was very sceptical about our new bushes claiming that we would be unlikely to see the fruits of our labour (excuse the pun) as passers by would inevitably steal all of the fruit off the new plants.

Admittedly we won’t have any fruit until next year but I am fairly optimistic that we won’t have people turning up in the front garden with an empty ice cream tub to take their fill of fruit. Maybe some overhanging fruit might disappear but I’m confident that any pilfering will be made up for the reduced bird numbers as the extra noise of traffic, pedestrians and cats seems to keep them away.

So far we have found the complete opposite as the conversations that were started over the fence lead to our neighbours generously offering up various produce of their own: cherry tomatoes, plums, runner beans and 3 lovely fuchsias. Perhaps the neighbourhood cynics would tell me that this generosity is just because they are after a punnet of fruit next year!

Posted by: iainduncani | July 21, 2010

Past Glory

With the passing of another world cup English football fans could easily be accused of clinging to former long lost glory. It would appear it is a national pastime not just enjoyed by football fans though after I saw this sign in some toilets in Helmsley, Yorkshire. Admittedly the 12 years aren’t as long as the 44 since our previous footballing successes but the award wasn’t as great either!

Image showing the loo award given in 1998

Posted by: iainduncani | June 27, 2010

The Budget: Call it what it is

Progressive seems to be the new buzz word in politics so it is no surprise that both the Tories and Lib Dems were keen to call last weeks budget a progressive one but the reality is that this budget is far from progressive.

Personally I earn more than the national average, I have no dependants and don’t receive any tax credits. You would imagine that a “tough but fair” budget where everyone “shares the pain” would mean that someone like me would therefore be facing a higher tax bill this week. However, the reality bizarrely is actually the opposite. By raising the threshold for paying income tax Mr. Osbourne gifted me £200. Factoring in the 1% rise in national insurance that Labour announced and the new government is keeping I am likely to be taking home just £86 of this (less than you may imagine as they are also intending to raise the threshold in line with the income tax threshold). Sure with the VAT increase I am likely to be shelling out an extra £190 in tax when I buy things but the freezing of council tax for two years will mean that in real terms I will be paying under £100 more tax a year in the future.

This does not seem right that an above average earner is facing such a small increase from a “progressive budget”.

The part I find particularly annoying is that those that will be hit hardest are the poorest in society. The government loves to talk about the income tax threshold helping the poorest people in society but sadly this just isn’t true. It helps the people that are on low to middle incomes. The poorest people in our society are those people that don’t earn over £6,000 but instead rely on hand outs from the government. By cutting things like housing benefit and reviewing disability allowances as well as increasing regressive taxes like VAT it is these people that will find themselves worse off this week.

Mr. Osbourne, please stop lying to us, this is not a progressive budget.

Older Posts »

Categories